Dynamic Partner Links and the UDDI BC
I recently posted a basic example of Dynamic Partner Links in OpenESB here. In this post, I'll show how to use the UDDI BC to dynamically resolve a service URL at runtime and invoke it.
Without dynamic partner links and the UDDI BC, what would you do if a service you're invoking from within your process was moved? Well, you'd have to modify, rebuild, and re-deploy your Composite Application. Using what I'm about to show you, your process can react to that change automatically.
Below is the tutorial (really just some high level steps). I've also uploaded my NetBeans modules and a copy of the tutorial here.
Prerequisites:
- OpenESB Installer
- jUDDI (additional install tips here)
Tutorial:
- Step 1: Create a New BPEL Module
- Step 2: Create a New SOAP WSDL with one request-response operation, and a simple BPEL process for the backend . We'll invoke this service dynamically later on.
- Step 3: Create a New UDDI WSDL with one request-resposne operation. (UDDI BC Demos can be found here)
- Step 4: Add an External WSDL File from http://schemas.xmlsoap.org/ws/2004/08/addressing. The WS-Addressing WSDL defines the EndpointReference element that we'll need.
- GOTCHA: NetBeans may add a character to the beginning of the wsdl when it imports. Make sure to remove this character. In some cases, this may be a hidden character that will only show up in an editor like VI.
- Step 5: Create another SOAP WSDL with one request-response operation. This service will provide the dynamic partner link functionality.
- Step 6: Create another BPEL Process. This process should lookup a service endpoint in UDDI and invoke the service using a dynamic partner link.
- Step 7: Clean and Build the BPEL Module.
- Step 8: Create a Composite Application and add your BPEL Module to it.
- Step 9: Clean and Build the Composite Application.
- Step 10: Correct the Composite Application's configuration using the CASA Editor.
- Generated:

- Corrected:
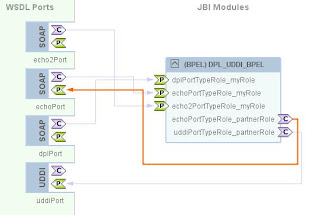
- Generated:
- Step 11: Clean, Build, and Deploy the Composite Application Again
- Step 12: Create a test case to invoke the service we've created.
- Step 13: Create another service to invoke, just as in Step 2. Make the BPEL process do something a little different so we will be able to tell which service was invoked.
- This WSDL must have the same target namespace and operation to invoke as the WSDL in step 2.
- This WSDL must have the same target namespace and operation to invoke as the WSDL in step 2.
- Step 14: Update the service endpoint in UDDI to point to the new service you created.
- Step 15: Run the testcase again. The output will show the new service was invoked.